One of the questions that we see come up quite often is how do you make left handed vs right handed Half Persian 3 in1.
It has a fairly simple answer: Counterclockwise vs Clockwise.
Explaining the simple answer is going to take a little bit longer.
 For all intents and purposes, Half Persian 3 in 1 (or really any half persian x in y chain) , when deconstructed to its base components, is a contracted 2 in 1 chain. Most of the time this is overlooked due to the fact that it is not the quickest way to assemble it. Usually, the direct connection to the end of the chain, the addition of the next ring in the chain, the inversion of the current ring, as well as the connection to the preceding cell are all done in a single step. It is the inversion and "lock" to the previous cell that causes the contraction in the 2 in 1 chain.
Half Persian 3 in 1 is a chiral weave. What this means is that a mirror image of the chain cannot be superimposed over the chain itself. In other words, there is a directionality to the chain. It is this directionality that is being referred to when describing Half Persian 3 in 1 as either "left leaning" or "right leaning". Directionality is further confused by other factors as well., such as the directionality changing depending on which side of the chain you're looking at and that weaving the mirror image (right to left vs. left to right) gives you a chain that leans in the opposite direction of the original.
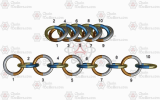 Half Persian weaves can be seen as 2 rows, the odd row and the even row. For this "tutorial" part of the article, we're going to do/show things a little differently than you may be used to.
A few things to keep in mind:
Steps

Please note: Whether you make the weave left to right, or right to left, the clockwise/counterclockwise method results in the same form:
Here's another animation showing all 4 being built at once.
We hope this article helps explain the difference between left and right Half Persian 3 in1.
As a side note, we'll be calling them clockwise and counterclockwise from now on
If you have any questions regarding this article, please join the discussion.
Chainmaillers.com
It has a fairly simple answer: Counterclockwise vs Clockwise.
Explaining the simple answer is going to take a little bit longer.
 For all intents and purposes, Half Persian 3 in 1 (or really any half persian x in y chain) , when deconstructed to its base components, is a contracted 2 in 1 chain. Most of the time this is overlooked due to the fact that it is not the quickest way to assemble it. Usually, the direct connection to the end of the chain, the addition of the next ring in the chain, the inversion of the current ring, as well as the connection to the preceding cell are all done in a single step. It is the inversion and "lock" to the previous cell that causes the contraction in the 2 in 1 chain.
 Half Persian 3 in 1 is a chiral weave. What this means is that a mirror image of the chain cannot be superimposed over the chain itself. In other words, there is a directionality to the chain. It is this directionality that is being referred to when describing Half Persian 3 in 1 as either "left leaning" or "right leaning". Directionality is further confused by other factors as well., such as the directionality changing depending on which side of the chain you're looking at and that weaving the mirror image (right to left vs. left to right) gives you a chain that leans in the opposite direction of the original.
 Half Persian weaves can be seen as 2 rows, the odd row and the even row. For this "tutorial" part of the article, we're going to do/show things a little differently than you may be used to.
A few things to keep in mind:
- When building, each ring is added to the previously added ring.
- Only Even number rings get inverted
- Odd number rings go under the previous odd ring in the chain.
- The steps are the same whether you are weaving left to right OR right to left. Right to left is on the left side of the images. Left to right on the right side of the images.
Steps
- Start with 3 rings.
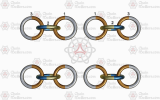
- Flip ring #1 so that it lays partially on top of ring #3.

- Add ring #4 to ring #3 (do not close it yet).

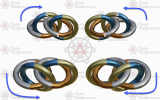
- Invert (rotate) ring #4 (counterclockwise or clockwise) and lock it inside the odd ring previous to the one you added it to. (In this case, ring #1). Make sure that ring #3 stays UNDER ring #1. Once locked, ring #4 is safe to close.
- Add ring #5 to ring #4.

- Ring 6 connected to ring 5, inverted and locked in ring 3.
- Ring 8 connected to ring 7, inverted and locked in ring 5.
- Ring 10 connected to ring 9, inverted and locked in ring 7.
- Top left is clockwise being built right to left
- Top right is counterclockwise being built left to right
- Bottom left is counterclockwise being built right to left
- Bottom right is clockwise being built left to right
Please note: Whether you make the weave left to right, or right to left, the clockwise/counterclockwise method results in the same form:
- Clockwise = Top Left & Bottom Right
- Counterclockwise = Bottom Left & Top Right
Here's another animation showing all 4 being built at once.
We hope this article helps explain the difference between left and right Half Persian 3 in1.
As a side note, we'll be calling them clockwise and counterclockwise from now on
If you have any questions regarding this article, please join the discussion.
Chainmaillers.com
