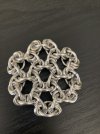
This tutorial uses:
Large ring: 4.8 AR (.387/.080") (recommended: 4.7 - 5.5)
Small ring: 2.5 AR (.200/.080") (all closed) (recommended: 2.5 - 2.9)
The small rings can be larger, though they will float around and not pull the Mobiuses in. This web tends to be loose and should be used in applications where it will end up being pulled evenly in all directions for maximum visual effect.
1. Connect 6 small rings to 1 large ring.
2. Add a large ring to 3 small rings, and the large ring from step 1, and apply 3 more small rings to it.
3. Add a large ring to the 3 small rings, and 2 large rings, and apply 3 more small rings to it. The 3 large rings must form a Mobius connection inside the small ring stack. The one shown here swirls in a clockwise direction, in terms of ring lean direction.
4. Add a large ring to one of the three ends. It will pass through 3 small rings, and one large ring. It is important to lean this ring in the direction that will counter-clockwise the next Mobius. If you lean it the wrong way, you would be starting to spiral, and Voodoo requires each Mobius' lean direction to alternate direction in relation to those which immediately surround it.
5. Add another large ring thus completing the second Mobius, which swirls in the opposite direction of the first. Also note that I didn't mention adding 3 small rings for the last few steps, and no longer will. This will be done in every step, except those which close off a web opening.
6. A large ring is added to one of the protruding ends.
7. Another large ring is added, completing the third Mobius unit.
8. Step 6 is repeated with another node.
9. Step 7 is repeated to complete the fourth Mobius.
10. In this step, one large ring is added (lowest one in the picture) that connects two nodes and completes the first web opening. No small closed rings are added in this step.
11. The fifth Mobius is finalized, at the lower right.
12. The sixth Mobius is finished, at the lower left. At this point the piece has perfect symmetry.
13. Another large ring is added (lower right).
14. The seventh mobius is completed.
15. The next large ring is added to one of the previously added.
16. Similar to step 10, a large ring completes the second web opening.
17. A large ring is added (lower).
18. As in steps 10, and 16, a large ring completes a web opening.
19. On the right at about 2 o'clock, another large ring is added which completes its respective Mobius.
20. To its end in the previous step, another large ring is applied.
21. The fourth web opening is completed.
22. At the bottom left at 7 o'clock, you guessed it: add a large, Mobius-completing ring.
23. To that applied in the previous step, another large ring is appended.
24. Close off the fifth web opening with a large ring.
25. In this step, add two large rings, one to the left, and one to the right of the central Mobius.
26. To the middle node, add two more large rings to make it a Mobius.
27. Close off the sixth, and seventh web openings with large rings. Now we've achieved perfect symmetry again.
28. To further expand the web, the right shows two additional large rings added.
29. Add one large ring to one end.
30. The next web opening is completed with one large ring attaching the two ends.
Keep expanding as needed by completing additional web openings.
Things not to do:
It is important to always make sure each Mobius swirls in the opposite direction to the last. The large ring on the right of this picture was added incorrectly. It swirls the wrong way.
It is possible to close off a web opening incorrectly as shown in this picture. If you accidentally do this, simply remove the offending large ring and add it back correctly, ensuring proper leaning. The large rings in each web opening alternate between left (L), and right (R) lean.
Left lean (L) vs. right lean (R):
In Voodoo Hex, six large rings complete one web opening using tessellation as found in Japanese 3 in 1. These large rings lean L-R-L-R-L-R with the final R connecting to the first L. In regular Voodoo, which expands squarely using tessellation as in Japanese 4 in 1, four large rings complete each section (no web openings there because of the more compact design). These large rings lean L-R-L-R, with the final R connecting the first L. There is no proper Voodoo sheet that uses tessellation as in Japanese 6 in 1, because there would only be 3 leans: L-R-L (or R-L-R), and one cannot properly link a left lean to another left lean.
M.A.I.L. entry:

M.A.I.L. - Maille Artisans International League - Weave Info
 mailleartisans.org